DIY Wood Projects That Change How Your Home Feels
There’s something quietly powerful about building an object yourself, especially when that object reshapes the atmosphere of a room. Woodworking doesn’t have to be daunting, nor does it demand a workshop crammed with pricey gear to leave a mark. In fact, some of the most memorable transformations come from straightforward DIY wood projects that play with texture and proportion rather than intricate design. Take a floating shelf made from a single reclaimed plank. It’s more than just storage - it’s a horizontal line that pulls the eye across a bare wall, breaking up emptiness while adding warmth without clutter. All you need is a saw, a drill, and a level; the instructions are simple enough for someone just starting out. What matters most is picking wood with pronounced grain, because that natural pattern becomes the centerpiece, not the brackets.
If you have a bit more time, a custom media console or a low-slung coffee table can reshape how a living room flows. These are the projects that ground a space, offering a solid surface for everyday life while doubling as a stage for your taste. Match the wood finish to the room’s existing palette, but don’t shy away from contrast - a dark walnut top against pale floors, for instance. This is where you can experiment with joinery, using uncomplicated lap joints or pocket holes to keep the build sturdy and the lines clean. The real perk of these larger pieces? They force you to plan around your own measurements, solving the headache of furniture that never quite fits from the store.
When floor space is tight, look upward. A wall-mounted wine rack or a vertical magazine holder can turn an empty corner into something both useful and decorative. These projects are easy to tweak, and you can make them from a single board, saving money and reducing waste. The trick is considering how the rack interacts with what it holds. A wooden wine rack doesn’t just store bottles - it cradles them, and the soft warmth of the material offsets the coldness of glass. You can build one in an afternoon with basic tools, and plans are easy to find online, but the real secret lies in the finish. A light sanding followed by a coat of linseed oil brings out the wood’s natural glow, making the piece feel like a deliberate, lasting part of your home rather than an afterthought.
The One Power Tool That Unlocks Every Beginner Wood Project
Stepping into a workshop for the first time, the array of tools can feel overwhelming. Table saws, routers, and countless gadgets line the walls, and it’s tempting to think you need them all to build anything worthwhile. But if you examine the most successful beginner woodworking projects, a single tool keeps reappearing: the pocket hole jig. This device solves the biggest hurdle for newcomers - creating strong, hidden joints without years of practice. With a pocket hole jig, you can take an ordinary board and turn it into a sturdy table, a functional rack, or a custom storage unit in minutes. The beauty is that it works with wood you already have and pairs seamlessly with any plans you follow, whether from a book, a blog, or your own imagination.
What makes this tool so effective is that it removes the intimidation of complex joinery. Instead of mastering dovetails or mortise-and-tenon techniques, you simply drill a precise angled hole and drive a screw. This lets you focus on design and assembly rather than getting bogged down in technique. For example, if you want to build a simple bench for your entryway, you can cut your pieces, drill pocket holes, and assemble the frame in under an hour. The joints stay hidden underneath, so the final piece looks clean and professional. You can start with just a few basic tools, and the jig itself is affordable - a smart investment for anyone wanting to make furniture without a big budget. Projects range from a sturdy workbench for the garage to a decorative wine rack for the living room, and each one will hold up for years.
This approach builds confidence in a way other methods don’t. When your first table doesn’t wobble and the screws hold tight, you start believing you can tackle bigger, more complex woodworking projects. The tool isn’t just about making holes - it gives you the freedom to take any set of plans and turn them into reality. Combine it with a circular saw for straight cuts and a sander for smooth finishes, and suddenly you have a complete system for creating custom wooden pieces. Start with a simple project, like a small shelf or plant stand, and let the pocket hole jig handle the joinery while you enjoy the fun parts: choosing wood, measuring carefully, and watching your idea come to life. From there, every project becomes possible, and you’ll wonder why you ever thought woodworking was hard.
How to Turn Scrap Wood Into Furniture That Actually Looks Expensive
If you assume building furniture from scrap wood means settling for a rustic, rough-hewn look, it’s time to rethink that. The secret to making simple DIY projects appear high-end isn’t the type of wood you use, but how you treat it. Start by selecting pieces with similar grain patterns and thickness, even if they come from pallets or leftover construction lumber. Once you have your boards, focus on the joinery: pocket holes or simple lap joints can give your table or rack a clean, seamless appearance that mimics fine craftsmanship. The real game-changer, though, is the finishing process. Sanding is your best ally - work from 80 up to 220 grit, and don’t skip the final hand-sanding along the grain. Apply a pre-stain conditioner before using a gel stain, which hides flaws and adds richness. A coat of satin polyurethane gives your wooden furniture that smooth, pricey sheen without looking plastic.

For your own woodworking projects, aim for designs that rely on proportion rather than complexity. A simple console table with tapered legs, for instance, looks far more luxurious than an ornate piece with mismatched details. You can achieve this with basic tools like a circular saw, drill, and sander - no full workshop needed. Plan your cuts carefully for clean edges, and use clamps when gluing to avoid gaps that scream “scrap.” To add visual interest, contrast the wood with black metal hairpin legs or a dark stain on the top while leaving the base natural. This not only elevates the project but makes the materials look intentional and curated.
Another trick that separates amateur builds from designer pieces is the use of inlays or simple geometric patterns. Take scrap pieces of different wood tones - like oak and walnut - and cut them into thin strips to create a checkerboard or herringbone top for a coffee table. This turns a basic DIY project into a statement piece that could cost hundreds in a store. For a rack or shelving unit, add chamfered edges or a subtle bevel to the front of each shelf. These small details catch the light and add refinement, making the piece feel custom. Remember, the most expensive-looking furniture is often the simplest in form, with every line and finish carefully considered. With patience and the right approach, the scrap wood you already have can become the centerpiece of your home.
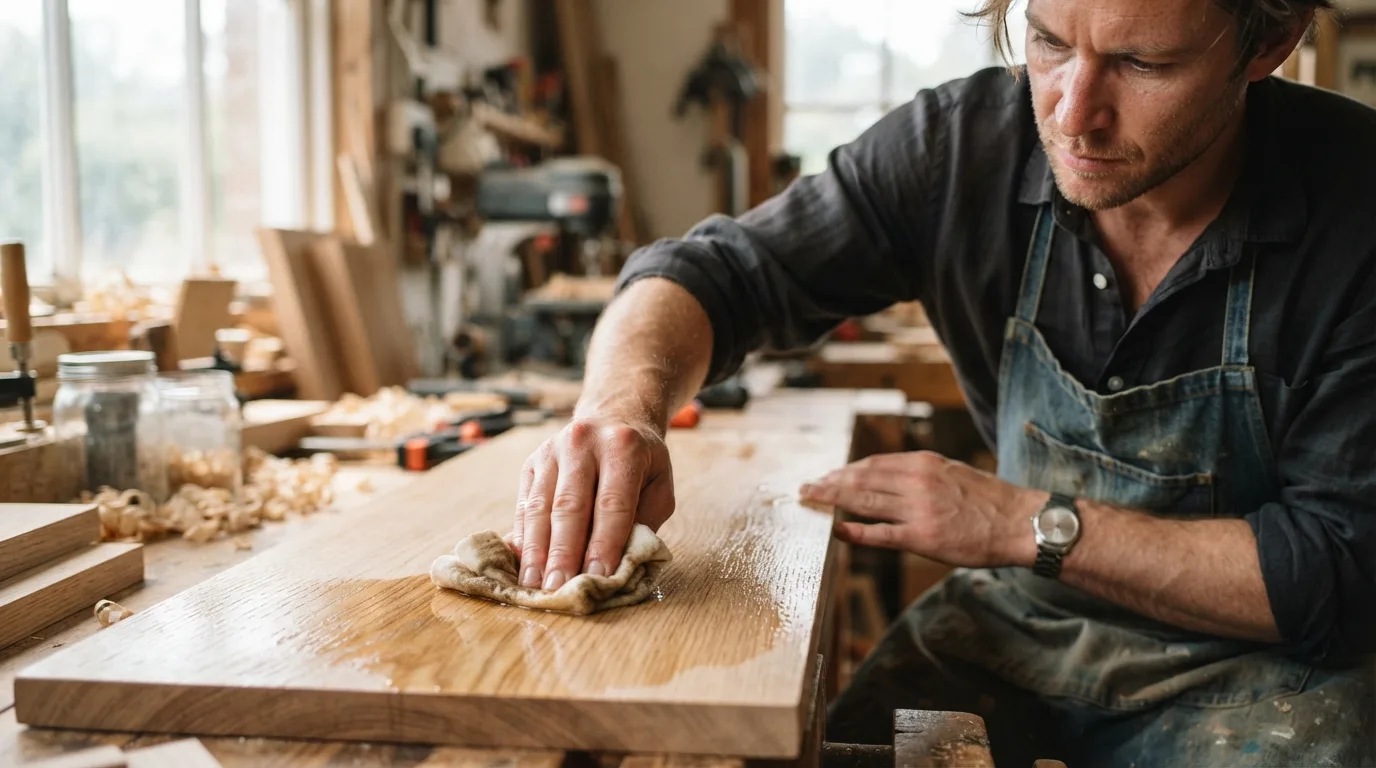
Wood Finishing Secrets That Make DIY Projects Look Store-Bought
After putting hours into a weekend project, the last thing you want is a finish that screams “amateur.” The secret to making your wooden creations look store-bought isn’t about owning expensive tools or following complex plans - it’s about mastering a few simple techniques that turn raw wood into a smooth, professional surface. Many DIY enthusiasts rush straight to the polyurethane, but the real magic happens before the first coat. Take a table you built from scratch: if you sand it progressively through finer grits, wipe it down with a damp cloth to raise the grain, then sand again with fine paper, you remove those tiny fuzzes that catch light and ruin the illusion. This step alone makes your woodworking projects feel like they came from a showroom. Another game-changer is the application method. Instead of brushing on a thick layer that pools and drips, use a lint-free cloth to wipe on a thin coat of oil-based finish. Build up multiple layers over a few hours, and with each pass, the wood gains depth without brush marks. This works beautifully for smaller projects like a wooden rack or custom shelf, where you want the grain to pop without a plastic-looking shell. Finally, consider your environment. Sanding in a dusty garage will trap specks in the finish. Wet the floor slightly before applying the finish to settle airborne dust. By combining these refined steps with your own woodworking plans, you get a result that feels intentional and high-end, not rushed. The difference is subtle but unmistakable: your DIY project no longer looks like a hobbyist’s effort, but something you’d confidently place next to a store-bought piece.
Wall-Mounted Wood Projects That Add Storage Without Clutter
When you start looking for ways to organize your home, the challenge often isn’t a lack of space but how you use what you already have. Wall-mounted wood projects offer a clever solution by turning empty vertical areas into functional zones without eating into your floor plan. Unlike bulky shelving units that visually crowd a room, a simple wooden rack mounted above a desk or beside a doorway can hold keys, mail, or small tools while keeping surfaces clear. The key is choosing designs that feel intentional rather than added on. For instance, a narrow wooden shelf with a built-in dowel for hanging mugs or towels does double duty without looking like an afterthought. You can build these yourself with basic woodworking tools, and the plans are often straightforward enough to complete in an afternoon. What makes these projects stand out is their ability to blend with your existing decor - a stained oak piece warms up a minimalist kitchen, while a painted white rack disappears into a laundry room wall. Avoid creating clutter on the wall itself by focusing on pieces that serve a specific purpose: a spice rack that mounts inside a cabinet door, a floating table that folds down for extra counter space, or a magnetic strip holder for metal tools that eliminates the need for a bulky drawer organizer. With the right approach, you get the storage you need without sacrificing the clean lines that make a room feel open. These projects are easy to customize; if you have a narrow hallway, a slim wooden magazine holder can be mounted flush against the wall, and if you work in a garage, a heavy-duty pegboard with custom wood brackets keeps your most-used tools within reach. By thinking vertically and choosing wood that complements your space, you turn simple DIY efforts into lasting solutions that reduce visual noise.
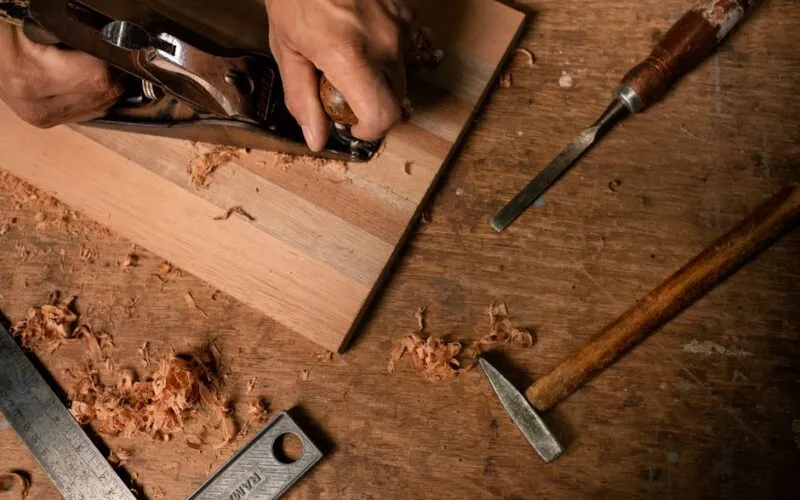
The Easiest Wood Joint for Strong, Professional-Looking Furniture
When diving into woodworking projects, the joinery you choose can make or break both the strength and the final look of your piece. Many beginners assume that complex cuts or expensive tools are required for a professional finish, but one technique stands out for its simplicity and durability: the dado joint. Unlike a basic butt joint that relies heavily on glue or screws, a dado joint involves cutting a shallow channel across the grain of one board so another fits snugly into it. This creates a large surface area for adhesive, resulting in a connection that resists racking and holds up over time. For your own woodworking projects, especially when building a sturdy table or shelving rack, this joint is a game-changer because it aligns pieces perfectly without needing clamps or complicated jigs.
What makes it so accessible is that you can achieve it with tools you likely already own. A simple router with a straight bit or a table saw with a dado stack lets you cut clean, consistent grooves. If you’re working on a DIY table frame, cutting dados into the aprons where the legs attach ensures everything locks together with precision. The result is a structure that feels solid from the moment you assemble it, and you can often skip metal fasteners entirely. This saves time and gives your project a cleaner, more refined appearance since no screw heads or nail holes are visible on the surface.
One of the most practical applications is building a wine rack or bookcase. Instead of struggling with flimsy shelves that sag over time, cut dados into the side panels and slide the shelves directly into those channels. The joint carries the load evenly, and with a bit of wood glue, you get a bond stronger than the wood itself. For larger projects like a dining table, combining dados with a simple rabbet joint on the back edge adds even more stability without complicating your workflow. This method encourages you to focus on accuracy with measuring and cutting, which naturally improves your skills across all woodworking projects.
Ultimately, the dado joint proves you don’t need elaborate plans or expensive machinery to build furniture that looks like it came from a professional workshop. It’s an easy, repeatable technique that gives consistent results, whether you’re making a small side table or a custom storage rack. By mastering this one joint, you open the door to countless design possibilities, and you can adapt it to fit almost any style or scale. So next time you want to elevate your woodworking, remember that the simplest solutions often deliver the most impressive outcomes.
Small Wood Gifts You Can Make in One Afternoon (That People Keep)
There’s a special satisfaction in making something with your own hands, especially when the finished piece becomes a permanent part of someone’s daily life. The trick is avoiding the obvious trinkets that gather dust. Instead of a generic coaster or a keychain that gets lost, focus on small wood gifts that solve a problem or create a tiny moment of joy. For example, a simple wooden phone stand is a project you can complete in an afternoon with just a scrap of hardwood and a coping saw. You don’t need a workshop full of expensive tools - a jigsaw, some sandpaper, and wood glue are often enough. The beauty of these projects lies in their utility: a hand-carved bookmark feels warm and natural against paper, and a small bottle opener mounted on a piece of walnut becomes a conversation starter rather than an afterthought.
When choosing your woodworking projects, think about what people actually use. A tiered spice rack for the kitchen is a fantastic example because it organizes chaos into order, and you can customize the dimensions to fit a specific countertop. You want the gift to feel thoughtful, not mass-produced. Another winning idea is a small desktop catchall tray for keys, coins, or pocket knives. This is an easy build that lets you play with joinery techniques like a simple finger joint, and it teaches you how to work with contrasting woods. Make something that feels sturdy and refined, even if you’re a beginner. People keep these gifts because they’re functional, and because the wood grain tells a story of your effort.
Don’t underestimate the power of a simple cutting board or cheese board, but give it a twist. Instead of a flat rectangle, try a board with a built-in juice groove and a small handle. You can also make a set of wooden napkin rings, which are deceptively simple to turn on a lathe or even carve by hand from a branch. The best part about these ideas is that you can complete them in a single afternoon, from rough cut to final oil finish. The projects are forgiving, and the learning curve is gentle. As you build your skills, you’ll find that the most memorable gifts are the ones that feel personal, practical, and made with intention. Whether you’re working with pine or cherry, the goal is to create something people reach for every day, not something they store in a drawer.
How to Design Your Own Wood Project When You Can’t Find Plans
Sometimes the perfect woodworking project doesn’t come from a set of plans, but from a problem you want to solve in your own home. When you can’t find plans for the exact table, rack, or storage solution you have in mind, the best approach is to design it yourself using simple principles. Start by measuring the space where the project will live. For example, if you need a rack for firewood or a small side table, note the height, width, and depth that make sense for your room. This gives you the core dimensions, and from there you can sketch a basic shape. You don’t need fancy software - a pencil and graph paper can get you far, especially with easy projects that rely on straight cuts and basic joinery.
The real insight is that you can build almost anything by thinking in terms of modules. Break your design into parts: legs, shelves, supports, and a top. For a wooden table, the top is one piece, the legs are four, and the aprons connect them. If you can make a simple box, you can make a cabinet. This approach also helps you use the tools you already own. A circular saw, a drill, and a square are often enough to get started. When you design from scratch, you avoid the frustration of adapting someone else’s plans to your materials or skill level. You also learn to read wood grain and choose the right fasteners for your joints, which makes the project stronger and more personal.
One practical example is building a wall-mounted rack for tools or spices. Instead of searching for plans, measure the width of your wall space and the height of the items you want to store. Cut a board to length, add a simple cleat system for mounting, and drill holes or attach hooks where needed. This is an easy project you can finish in an afternoon, and it teaches you how to design with function in mind. The same logic applies to larger pieces: you can scale up a simple shelf design into a full bookcase by repeating the same unit. Trust your eye and your tape measure, because the best woodworking projects are the ones that fit your life, not someone else’s template.
Outdoor Wood Projects That Survive Rain, Sun, and Snow
When you invest time in woodworking projects intended for outdoor use, the real test isn’t how they look in the workshop - it’s how they hold up after a season of rain, scorching sun, and heavy snow. Many DIY enthusiasts assume that any sturdy wooden table or rack will survive the elements, but the truth is more nuanced. The wood you choose, the joinery techniques you apply, and the finish you use can make the difference between a project that weathers gracefully and one that warps or rots within a year. For example, building a simple garden bench from cedar or pressure-treated pine, paired with stainless steel screws and a quality spar varnish, gives you a piece that can stay outside without constant maintenance. You can get excellent results by focusing on movement: wood expands and contracts with moisture, so allowing for that natural shift in your design prevents cracks and splits.
One often overlooked insight is that the most durable outdoor woodworking projects are those designed with water shedding in mind. A flat tabletop might look clean, but if water pools on it, you’re inviting decay. Instead, consider a slight slope or gaps between slats, like you see on classic picnic tables, so rain drains quickly. This principle applies to everything from a firewood rack to a planter box. With the right approach, you can build a simple storage rack that keeps your logs dry off the ground, using